

Pixelated photos are a common issue for photographers and designers alike. Whether it's an old photo, a compressed professional image, or an online screenshot, unclear visuals often leave you frustrated.
Thankfully, modern tools help depixelate image with ease. But how? In this post, you will learn about the reasons for image pixelation and how to fix pixelated photos on desktop, mobile, and online.
 Screenshot
Why Do Photos Become Pixelated?
Understanding why an image is pixelated helps you choose the best depixelation method. Since images are made up of pixels, a higher pixel density makes images sharper and clearer. However, when the pixels are too low for the display size, photos become pixelated. Other common causes include:
• Low image resolution: When images with fewer pixels are enlarged, they lose detail and clarity, resulting in pixelation.
• Improper resizing: Zooming into an image without enhancement tools stretches pixels, causing blurriness.
• High compression: Aggressive or repeated compression of images introduces pixelation and artifacts.
• Poor editing: Basic tools like adding filters or cropping, without proper techniques, can degrade image quality.
• Low-quality formats: Saving an image in formats like JPEG reduces its sharpness, resulting in a rougher texture.
Can You Really Fix a Pixelated Image?
Yes, you can depixelate image, in most cases. But the results depend on how severe the pixelation is and the method you use. Slight pixelation can be easily and perfectly fixed. However, you may not achieve perfect clarity in severely pixelated images. But whatever the case, the right tool and technique make a blurry pixelated image look clearer and more usable than the original.
5 Best Methods to Fix Pixelated Photos Instantly
There are multiple ways to fix pixelated photos and improve their quality, making themperfect touse in your projects. Let's explore the top five methods in detail:
Method 1: The Best AI Way to Depixelate an Image (HitPaw FotorPea)
Best for: Quick, one-click processing
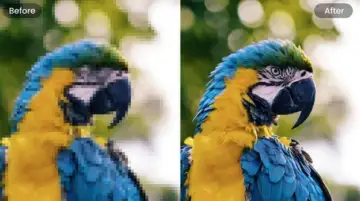
HitPaw FotorPea is a remarkable AI photo enhancer for Windows and Mac users that can effectively enhance pixelated image with Generative AI to improve clarity and reconstruct missing details. It can help enhance portraits, repair compression blur, remove grain, and more, ensuring precision in every pixel. You can also restore old, damaged, and low-resolution photos and upscale them, converting them into masterpieces in seconds. It also supports de-pixelating multiple images at once.
How to Fix Pixelated Images with HitPaw FotorPea
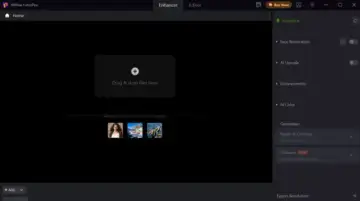
Step 1. Upload Photo
The first step is to install and launch this program. Now, click "Enhance Photos Now" and then drag & drop your pixelated image.
 Screenshot
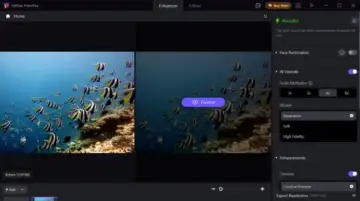
Step 2. Select the AI Model
It's time to choose the appropriate AI model to enhance a pixelated photo, such as upscaling, denoising, sharpening, etc.
Step 3. Preview and Export
Once the AI completes processing, press the "Preview" button. If the results are fine, hit "Export" and you're all done.
 Screenshot
Method 2: Fix Pixelated Images in Photoshop
Best for: Professional control and precise adjustments
Adobe Photoshop remains the standard for photo editing. However, it allows precise control over depixelating photos using neural filters, layer adjustments, and smart upscaling. You can use denoising, sharpen, and other filters, as well as increase the image size for depixelation.
It also allows you to adjust various image details manually. However, this requires editing expertise and a high-end computer.
How to Fix Pixelated Image in Photoshop
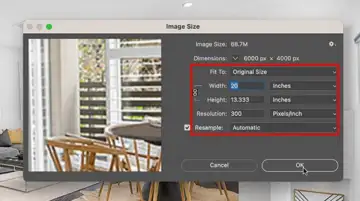
Step 1. Open Image Size
Launch Photoshop and click "File" > "Open" to open the pixelated photo. Now, go to "Image" >"Image Size."
 Screenshot
Step 2. Adjust Pixels
Next, you can increase the resolution (at least 300 DPI) and adjust the pixel settings that align with your requirements.
 Screenshot
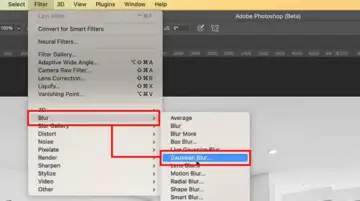
Step 3. Choose Filter
From the menu bar, press "Filter" > "Blur" > "Gaussian Blur." Then, adjust the slider to achieve the desired smoothing effect. Hit "OK."
 Screenshot
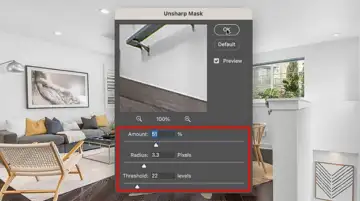
Step 4. Adjust Unsharp Mask
Lastly, tap "Filter" again and choose "Sharpen" > "Unsharp Mask." Then, fine-tune the scroll bar until you achieve the outcome. Hit "OK."
 Screenshot
Method 3: Use an AI Tool to Fix Pixelated Image Online Free
Best for: Quick, web-based enhancement
Several online AI tools, like Fotor, allow you to unpixelate image online free. It helps you reduce pixelation with a single tap. It can automatically enhance photos by sharpening details, upscaling resolution, and reducing blur, to improve overall quality.
Although it doesn't yield the best quality and leaves a watermark on the output, it's a great free option for general enhancement. Let's comply with the given steps on how to fix pixelated photos.
How to Fix Pixelated Image Online Free with Fotor
Step 1. Open Pixelated Photo
Firstly, open the Fotor photo editor in your browser. Now, click "Upload Image" to import the pixelated photo.
 Screenshot
Step 2. Enhance the Photo
Next, you can click "1-tap Enhance," "Face Unblur," "AI Skin Retouch," or other AI tools, depending on your photo.
 Screenshot
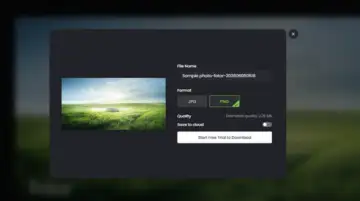
Step 3. Download Output
The AI will take seconds to process the image. Then preview it, and if it looks great, tap "Download," select the output format, and hit "Download" again.
 Screenshot
Method 4: Make an Image Less Pixelated on iPhone/Android
Best for: Photo restoration on mobile phones
Mobile users can enhance pixelated photos directly on their devices using apps like PhotoGrid. This fantastic AI image enhancer can fix pixelated portraits, screenshots, and old photos by increasing the brightness, improving clarity, and restoring details. You can also upscale the blurryor grainy images to 4K resolution without losing quality. Also, it's a free app with no watermark.
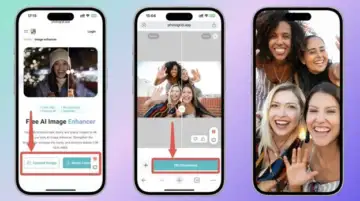
How to Depixelate an Image with PhotoGrid on iPhone/Android
Step 1. Upload Image
Install and launch the PhotoGrid app on your phone. Now, press the "Upload Image" button to import the pixelated photo.
Step 2. Depixelate Image
After uploading the image, wait a few seconds. The AI will automatically process it and deliver the result.
Step 3. Download
Finally, compare the before-and-after results. If okay, hit the "HD Download" button and that's all.
 Screenshot
Method 5: How to Fix Pixelated Pictures on Canva
Best for: Quick and easy workflow for social media
Canva is not just for design; it can also smooth out pixelation for presentations, social media, andgraphics. With its beginner-friendly interface, you can sharpen grainy or pixelated images in seconds. This free platform offers both AI tools, such as an upscaler and an enhancer, and manual adjustment options for sharpening, brightness, and other parameters.
How to Make an Image Less Pixelated on Canva
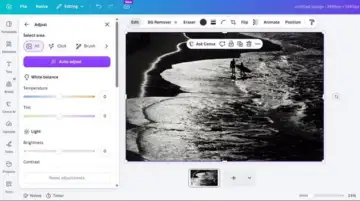
Step 1. Import Image
Open the Canva tool, start a new project, and upload the pixelated image to your library if it's not a part of your design.
Step 2. Enhance Photo
Now, click the photo and press the "Edit" tab. Then tap "Upscale" for a single-click enhancement. Or tap "Adjust" to change the parameters manually.
Step 3. Download Output
Lastly, press the "Download" tab, select the format, and then hit "Download" again. That's all!
 Screesnhot
Which Method Fits Your Needs?
Choosing the right solution depends on your device, skill level, and whether you prefer online or offline tools. Below is a list of all the enhancement tools with their best use cases:
• HitPaw FotorPea: Go for this software to automatically and quickly enhance images with minimal effort. It also runs smoothly on low-end PCs and delivers great results.
• Adobe Photoshop: Ideal for professionals who need precise control over sharpening, noise reduction, and upscaling.
• Fotor: This versatile online editor can handle everyday social media edits and basic AI enhancement features on the go.
• PhotoGrid: It is suitable for those who want to instantly fix pixelated portraits or old family photos right from their smartphones.
• Canva: If you are already using Canva, it works best for fixing pixelated images when creating graphics or social media content.
Common Mistakes When Fixing Pixelated Photos
In addition to learning how to fix pixelated photos, it is important to know about common mistakes that can worsen pixelation. Let's consider:
• Over-processing: Too much sharpening and other effects can create harsh edges, halos, and unnatural artefacts that draw attention away from the subject.
• High Saturation: Over-saturating colors to a high level makes the image look artificial and cartoonish, creating a visual imbalance.
• Heavy Filters: Although filters can speed up the process, leaning on them too much can create an unnatural appearance.
• Skipping Noise Reduction: Fixing pixelation without reducing noise can keep images looking grainy.
• Poor Cloning: Overusing the healing tool without precision often leaves behind smudges, repeating patterns, or obvious marks.
• Low-Quality Tools: Some free apps may smooth the skin but eliminate depth, turning the image into a plastic-like surface.
• Not Having a Backup: Editing the original photo without saving a copy risks permanent quality loss.
Conclusion
After reading this post, you have learned how to fix a pixelated image across various devices. Whether you want to unpixelate image online free or offline, there is a solution for everyone. You can follow the steps for the method that fits your requirements. Although all the tools are good, try HitPaw FotorPea, which helps you easily restore clarity to your photos and delivers the best results.
FAQ About Fixing Pixelated Images
1. Is there a free way to fix pixelated images?
Yes, various tools like HitPaw FororPea, Fotor, and Canva offer a free version to fix pixelated images. However, you have to face limitations such as watermarked exports, file size limits, and others.
2. How to turn a pixelated PNG into clearer?
You can use an AI-powered upscaling tool like HitPaw FotorPea to depixelate PNG images while maintaining transparency. It analyzes and predicts the missing pixels to add natural clarity to the photo.
3. How do I avoid getting pixelated images in the future?
To avoid pixelated images, always shoot at the camera's highest resolution, resize images properly, never do over-compression, save files in an uncompressed format, and keep the original image as a backup before editing.